Free Shipping on orders $70+ USD
 Courier & USPS Deliveries Available
 Rated 4.9 out of 5 on Trustpilot


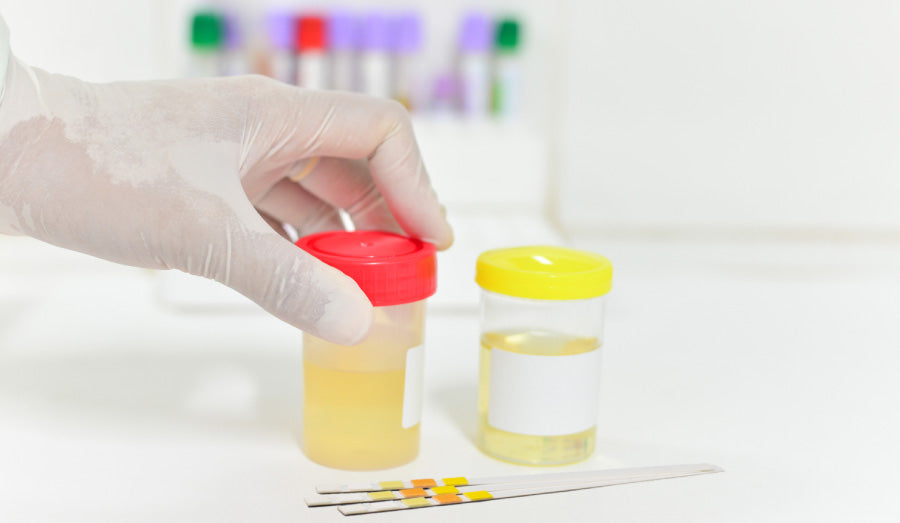
How to use Urine Test Strips
By David Smith
Jul 1, 2024
While UTI Test 5V® is suitable for professional testing by medical professionals, it is also ideal for home use. We thus include a very easy to understand guide for people who are not at all technical, as well as the full medical information leaflet, for professionals who understand the technicalities.
Full instructions are inside the box.
The urine test Strips are a fast and easy-to-use indicator of the infection condition of your urine. See your doctor or urologist for more detailed advice about interpreting the results.
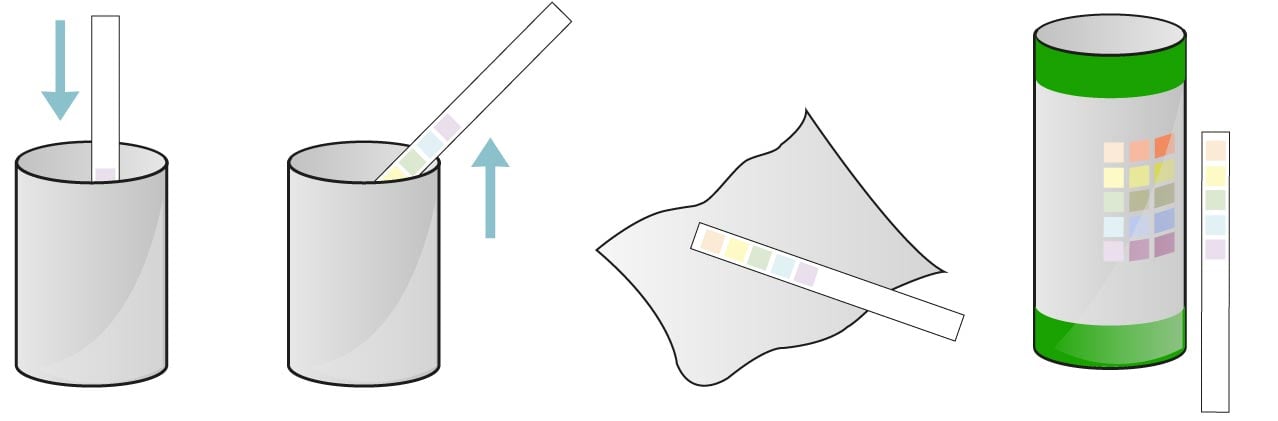
- Urinate into a clean container.
- Remove one urine test strip and close the tub tightly immediately. Dip it into the urine for 2 seconds. Tap on the side of the container to remove excess. Any excess that passes between the urine reagents can invalidate the results.
- Observe the reagent patches. The first item to check (after 20 - 30 seconds) is the pH 2nd from bottom.
- If the reagent has gone Orange, that is too acidic.
- If it has gone deep green that is too alkaline.
- Check the Protein (middle one). Any greenish/ turquoise indication is a sign of the presence of protein. The darker it is, the more is present. Usually, this means your kidneys are involved in an infection. See your doctor for advice.
- Check for Blood (bottom indicator). Any green colouration means blood presence (red blood cells). If the reagent goes deep green within 60 seconds of dipping the urine test strip, it shows blood may be present in your urine. The deep green colourisation maybe caused by many different things, so try not to worry and consult your doctor for advice.
- Check for Nitrites next (2nd top indicator). Nitrites are cracked from Nitrates by bacteria, so any pink colouration indicates bacterial presence. Check the final reagent (the top one) for Leukocytes (white blood cells). Any pink colouration within 2 minutes of dipping means inflammation is present and perhaps bacteria.
You can adjust your urine pH by making changes to your diet. See Making your urine more alkaline or try speaking with a dietician.
The more colouration within the time frames indicated, the higher the possibility of bacteria being present, and at higher concentrations. To have your urine checked to find out detailed information about bacterial strains and kidney involvement, or for further interpretation of the results, see your doctor / medical expert.
Other things to consider
While monitoring the health of your urine can help in understanding your progress, it may not represent the whole picture. UTI Test 5V® can tell you with a high degree of reliability if there is still infection present in your urine, but cannot tell you what species of bacteria are causing the symptoms. If natural remedies are unable to clear the infection, consider having your urine cultured by a competent clinic to identify the agents of infection.
Urine Test Benefits
- Simple home test, with 50 urine test strips per pack, allowing repeat testing over an extended period.
- Quickly check the pH of your urine. A pH of 7.5 to 8 (alkaline) helps slow bacterial growth in most cases and helps prevent future infections. Our grandmothers knew this and used to drink lemon barley water to create an alkaline environment, inhospitable to most bacteria that cause UTIs.
- Checks for Blood, Leukocytes, Protein and Nitrites. Blood and Leukocytes indicate inflammation and or infection. Protein means possible kidney involvement in the infection. Nitrites are typically only in the urine if bacteria are present.
- Gives medical-level reliability.
- Provides simple instructions for home use.
- A diagnostic aid trusted by Sweet Cures' customers for many years. We have sold thousands of test kits, and have always received excellent feedback on their effectiveness and how easy they are to use in comparison to other brands. Normally received the next day.
- Supported by an unrivalled customer service team with over ten Years Expertise
Urine Test Principles And Limitation
Leukocytes:
The test reveals the presence of granulocyte esterases. These esterases cleave an indoxyl ester, and the indoxyl so liberated reacts with a diazonium salt to produce a violet dye.
Leukocyte esterase results may be positive in the absence of observable cells if the leukocytes have lysed. Positive results may occasionally occur with random specimens from females due to contamination of the urine specimen by vaginal discharge. Elevated glucose concentrations (55-110 mmol/L) or high specific gravity may cause decreased test results. The presence of some medications may cause decreased reactivity, and high levels of the drug may cause a false-negative reaction. The test area does not react with lymphocytes.
Nitrites:
Based on the principle of Griess’s test and is specific to nitrites. Any degree of uniform pink colour development indicates positive results.
Positive results of the nitrites test suggest the presence of 105 (100,000) or more organisms per mL of urine, but colour development is not proportional to the number of bacteria present. A negative result does not in itself prove that there is no significant bacteriuria. Negative results may occur when urinary tract infections occur due to organisms that do not contain reductase to convert nitrate to nitrite. When urine has not been retained in the bladder long enough (4-8hrs) for reduction of nitrate to occur; or when dietary nitrate is absent, even if organisms containing reductase are present and bladder incubation is ample. Ascorbic acid concentrations of 2.8mmol/L or higher may cause false negative results with specimens containing nitrite ion concentrations of 35μmol/L or less.
Protein:
Based on the principle of the protein error of a pH indicator.
The reagent area is sensitive to albumin. An elevated pH (up to 9) may affect the test. If the residue of disinfectant containing quaternary ammonium groups or chlorhexidine is present in the urine collection container, this may lead to a false positive result.
pH:
This test contains a mixed indicator which assures a marked change in colour between pH5 and pH8.5. It may be necessary to repeat this many times with a space of 3 hours between tests to determine the prevailing pH. High or low pH or wild swings in pH may indicate the presence of bacteriuria.
Blood:
Haemoglobin and myoglobin catalyse the oxidation of the indicator by means of organic hydroperoxide contained in the test paper. This test is highly sensitive to haemoglobin and thus complements microscopic examination. The sensitivity of a test diminishes in urine with high specific gravity. The test is equally sensitive to myoglobin as to haemoglobin (Haemoglobin concentration of 150-620 μg/L is approximately equivalent to 5-15 intact red occult blood cells per microlitre). Blood is likely to found in the urine of menstruating females. Oxidizing contaminants, such as hypochlorite, may produce false positive results. Microbial peroxidase associated with urinary tract infection may cause a false positive reaction. Ascorbic acid concentrations of 2.0mmol/L or greater may cause false negatives at the trace levels.
Sensitivity And Range
Sensitivity is dependent upon the presence or absence of interfering specimens.
| Item | Sensitivity | Range |
|---|---|---|
| Leukocytes | b15-40 cells/µL granulocyte | Negative-500 cells/µL |
| Nitrite | 13-22 µmol/L | Negative-positive |
| Protein | 0.10-0.15g/L albumin | Negative-5.0g/L |
| pH | 0.5 pH unit | pH 5.0=8.5 |
| Blood | 0.15-0.6mg/L haemoglobin | Negative-200 cells/µL |
Reagents Composition
Based on the dry weight content of each reagent in 100 pieces:
- Leukocytes: indoxyl ester 1.4mg, diazonium salt 0.7mg;
- Nitrite: sulfanilamide 0.65mg, N-(naphthyl)-ethylenediammonium dihydrochloride 0.45mg;
- Protein: tetrabromphenol blue 0.36mg;
- pH: methyl red 0.06mg, bromthymol blue 1.3mg;
- Blood: cumene hydroperoxide 35.2mg, 3,3',5,5' -Tetramethylbenzidine 15.0mg.
Precautions
- HANDLING: Use a clean container to collect urine. False-positive readings for Blood can result from residues of strongly oxidising disinfectants in the specimen collection container. Do not add preservatives to the urine to be tested.
- OPERATION: Avoid shaking the urine test strip in a specimen container to prevent incorrect results. Dip for approx. Two seconds. If the dipping time is too short or too long, the results may be unpredictable.
- SPECIMEN COLLECTION AND PREPARATION: Collect urine in a clean container and test as soon as possible. Do not centrifuge. Avoid the use of urine preservatives. If testing cannot be performed within one hour after voiding, refrigerate the specimen immediately. Allow refrigerated specimen to return to room temperature before testing.
Test Procedure
- Remove one piece from the tub at a time and replace cap tightly.
- Immerse reagent areas of the urine test strip in fresh, well-mixed urine. Remove the urine test strip immediately to avoid the dissolving out of reagent areas.
- While removing, tap against the rim of the urine container to remove excess urine. Blot the urine test strip on a long edge, on absorbent paper. Avoid running over (contamination from adjacent reagent pads).
- Compare each reagent area to its corresponding colour blocks, shown on the colour chart and read at times specified. Proper read-time is critical for optimal results.
- Obtain results by direct colour chart comparison.
NOTE: Read reagent results between 1-2 minutes for differentiating a positive sample from a negative sample. Changes in colour after 2 minutes are of no diagnostic value.
Quality Control
For best results, confirm the performance of the reagents by comparing with known negative and positive specimens or controls. This procedure is recommended after use of every 25 urine test strips and for each change in urine test strip containers and lot. User/labs should establish their own goals for performance standards.
Results
Obtain results by direct comparison of the colour chart printed on the container label. The colour chart represents nominal values. Actual values will vary around the nominal values.
Handling Care
Improper storage may cause inadequate performance of urine test strips. Return to room temperature before use. Do not use deteriorated, discoloured or blackened test strips. Avoid contamination by volatile chemicals.
Please Note
On principle, Use multiple results for diagnosis or therapy, in the context of all other medical findings. Knowledge of the effects of drugs or their metabolites upon the individual tests is not yet complete. In doubtful cases, it is, therefore, advisable to repeat any testing after discontinuing a particular drug. Large amounts of ascorbic acid in the urine can produce artificially low to false-negative results when testing for blood and nitrites.
Storage and Stability
Store at temperatures between 2 C to 30 C avoiding humidity, direct sunlight, or heat. Store only in the original tub. Do not remove desiccants. Do not remove a urine test strip from the tub until immediately before its use. Replace cap quickly and tightly. After opening use any remaining urine test strips within three months. Do not use after the expiry date printed on the label.